AWS Onboarding Integration – STS Authentication
Keeps your EC2 Elastic IP addresses or Amazon Route 53 hostnames updated as assets in edgescan.
Connect AWS to edgescan
Create a new IAM role & provide access
1. Sign in to the AWS Management Console and open the IAM console at https://console.aws.amazon.com/iam/.
2. In the navigation pane of the console, choose Roles and then choose Create role.
3. Choose AWS account role type.
4. Choose Another AWS account and enter the Account ID to which you want to grant access to your resources. This should be Edgescan’s AWS account ID which must be requested.
5. Select Require external ID, and input edgescan-cloud-onboard– followed by a unique ID. For example, edgescan-cloud-onboard-159ahw8Vq736lmbi . Note: The external ID will need to be shared with edgescan later so make sure to take note of it here.
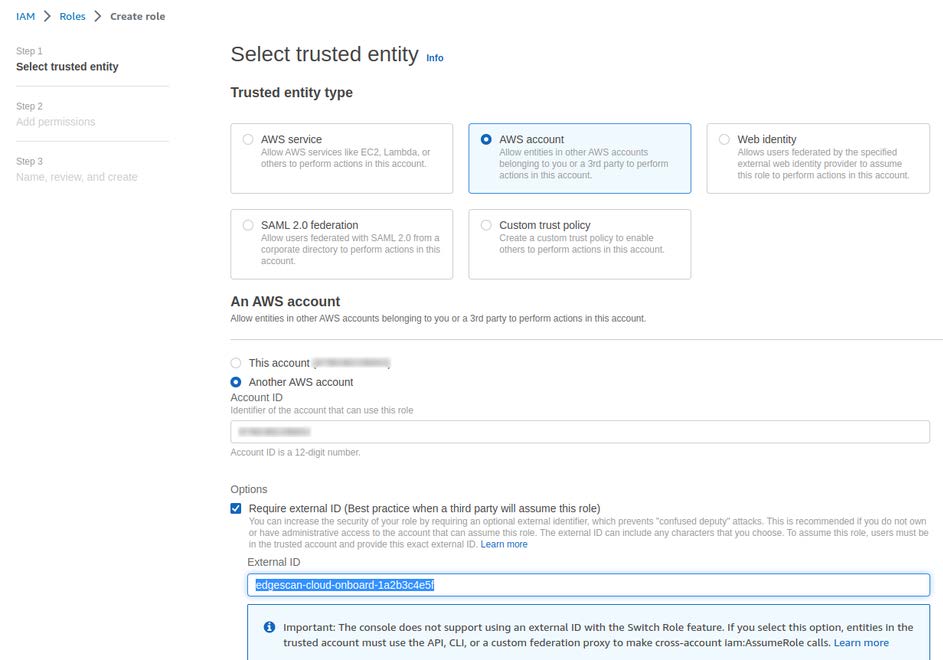
6. Click Next . The new role will need to be granted permissions using the following AWS policies:
- ‘IAMReadOnlyAccess’ – Used to fetch the “account alias” of the AWS account.
- ‘AmazonEC2ReadOnlyAccess’ – Used to fetch EC2 Elastic IP addresses.
- ‘AmazonRoute53ReadOnlyAccess’ – Used to fetch Route 53 hostnames.

7. On the next page add a role name, edgescan-cloud-onboarder for example, and leave a description if you’d like to go into further detail about the role.

8. Review the role and then choose Create role.
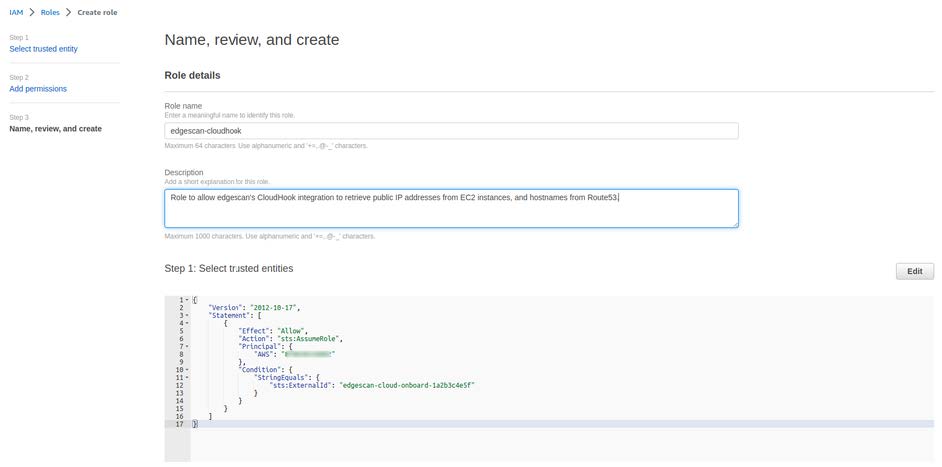
9. Provide edgescan with the External ID and the new Role ARN.
AWS Onboarding Integration
Keeps your EC2 Elastic IP addresses or Amazon Route 53 hostnames updated as assets in edgescan.
Connect AWS to edgescan
Add a new IAM user & provide access keys
Since you are connecting edgescan to your AWS account via access keys, we recommend creating a new user in your AWS account. When creating a new user, please ensure that Programmatic access is checked.
The new user will need to be granted permissions using the following AWS policies:
- ‘IAMReadOnlyAccess’ – Used to fetch the “account alias” of the AWS account
- ‘AmazonEC2ReadOnlyAccess’ – Used to fetch EC2 Elastic IP addresses
- ‘AmazonRoute53ReadOnlyAccess’ – Used to fetch Route 53 hostnames
Accounts with the ‘AdministratorAccess’ policy could also be used, but we would advise against this.
Once your new user account is ready you’ll need to generate an access/secret key pair. AWS have a guide on how to do this, here’s the main steps:
- In the IAM console under Users, click on the new user’s name
- Select the Security credentials tab
- Click Create access key in the Access keys section to create a key pair that consists of an Access key ID and Secret access key
- Take note of both of these keys and provide them to edgescan.

